Polar Alignment For German Equatorial Mounts, GEMs.
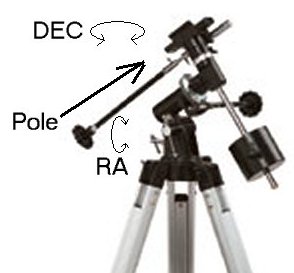
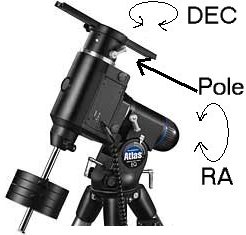
On a GEM, the wedge is replaced by a solid looking unit that
has a shaft for RA rotation and another shaft for DEC rotation. (See the illustrations .)
The entire "head" has an altitude setting that usually has degrees marked on it. (See
the silver arrow marker above the "s" on the "Atlas" mount?) This should be set close to
your observing latitude. This setting will aim the RA shaft toward the celestial pole.
Some higher end mounts include or offer as an option a "Polar Alignment Scope" that mounts
in a hole drilled through this shaft. The level of precision depends on the amount you're
willing to shell out. ($$$) No amount of money, in my opinion, will give absolute accuracy
and a perfect alignment. You can come close yes, but I recommend you learn this simple
procedure and save your money. Once mastered, polar alignment becomes second nature and
the $200 polar scope is relegated to ballast for the mount.
If you've read the earlier tutorial for fork mounted scopes,
you saw that I mentioned bringing bricks with me to the field for adjusting the altitude
of the mount. This was because the tripod that came with my scope lacked adjustable legs.
Let's just go ahead and assume you have adjustable legs on yours, as I now have. :-) When
we get to the altitude adjustments, you can just use these. While we're at it, let's say
your finder scope and Telrad are aligned, (or "collimated"), with your main optics, too.
Ok, you start by setting up the tripod to make the base of the head as level as possible.
Set your altitude adjustment to closely match you latitude. (You notice how similar these
two words are? Coincidence? Hmmm...) Anyway, point the RA shaft toward Polaris in the
north and Sigma Octantis in the south. (A southern hemisphere guide is in the works.
Unfortunately, it'll have to wait until I visit there and try it out first hand. Sorry.
(-:) You can get close by looking through the hole in the RA shaft, where the alignment
scope would be if you had one, or just sighting along the telescope tube. This works
especially well if you have a Telrad. I just point the scope north and move it around
until I see Polaris inside the middle sighting circle. If it's in there, it should be
in your finder scope. You want to line it up as in the other tutorial-on a line
extending from Alkaid to Segin, (the star at the end of the handle of the Big Dipper
and the star at the end of the flattened side of the "W" of Cassiopeia, respectively).
If you have a 6 x 30 finder, you can move the mount so Polaris is about 1/2 way out from
the center along the line described on the Alkaid side. This should get you close enough to
track objects for up to an hour at a time. It sounds complicated I know, but do it a couple
times and it gets easier.
While this level of accuracy
is good enough for viewing, it is still insufficient for astrophotography. The most
accurate, and also the most tedious method I've tried so far is Called "Drift Alignment".
It takes some time and patience, but it's well worth the effort. You need to pick and
locate a bright star that's close to the celestial equator and just East of due South.
A higher power eyepiece with an illuminated reticle crosshair helps here. Mine is a 12mm ep.
Align the star as close
to the center lines as possible. With the drive on, watch the star as it drifts away from
center. The farther you are from aligned, the faster it will drift. Ignoring the drift
in Right Ascension, note which way the star drifts in declination. If it drifts North, your
tripod is pointing too far
to the West. If it drifts South, you are too far East. Turn the tripod a very small amount
and try again. You can get a feel for how much drift there is by paying attention to how
long you observe the drift at each stage. If the star passes the meridian, choose another.
Once you get the
drift to a minimum, choose another bright star close to the equator but near the Eastern
horizon, about 30 degrees elevation. Center it in the eyepiece and watch for drift. If it
drifts North, you are aimed too high. If it drifts South, you are aimed too low. Adjust
the leg height to compensate. Reacquire the star and repeat the process. You can and should
repeat the azimuth adjustment and then the altitude adjustment again, just make sure you
haven't sent them off into the weeds too much. Again, it sounds complicated, but with practice
it can be done within an hour or so. Time well spent IMHO.
Of course, you may not need to do this in the field if all you are after is rough alignment
for a nights worth, but it will help if you want to set up something more permanent and for
public star parties it never fails to amaze folks how it stays in the eyepiece, whereas all
the Dobs have to keep adjusting. :-).
If you're doing this in your back yard, it may be a good idea to place some sort
of semipermanent markers in the ground, so all you have to do is plop the legs down and
you'll be reasonably close to aligned for the night.
That should do it for alignment. What
you need to do now is to calibrate your RA setting circle so you can find other objects.
(Keep in mind that the accuracy of your pointing depends heavily on the accuracy of your
alignment.)
Follow the link at the bottom of this
text to get a printout of bright stars and their celestial coordinates. Choose one that's
close to the object you're seeking and use its coordinates to set your circle. The numbers
mark hours
of right ascension, the long marks denote 15 minute intervals and the short marks denote
5 minutes of RA. These are equivalent to longitude on Earth. Declination is marked in
degrees above and below the equator.
After that, it's
just a matter of dialing in
the coordinates for an object you want to see and surfing around a little until you find
it!
If you have any
questions at all, please don't hesitate to email me!
9/16/99: A number of people have asked for a little more
explanation of exactly why polar alignment is important, and especially what each
step of this procedure is accomplishing. This page is valid for GEM's as well as fork
mounts. I encourage you to read it, too. Please click here
for a little more detail.
Steve Dodder aka Astroman fester00@hotmail.com